Data Storage and Transfer
Wistar HPC Key Directories
- Home - /home/username
- Lab Share - /wistar/lab-name
- Tempdrop - \\cifs\tempdrop\lab-name (only accessible through Windows or MacOS)
- Linux (HPC Lab Share) - \\cifs\lab-name\linux
- Custom Shares - /wistar/custom-share-name
- Resources - /resources
- Applications - /applications
Home Directories
Each user is provided with a home directory with their own .bashrc and .bash_profile file. These can be configured by end users, to but if leveraging installed applications, you should not need to update your PATH variable here, loading Application modules will automatically update your PATH variables.
Do not install applications in your home folder, if you need an application installed, please see Getting Help.
Do not store large datasets in your home directory, these should be stored in your lab share.
Home directories are NOT BACKED UP, so if the dataset or application folder is deleted, it is gone forever.
Lab Shares
Each user is provided access their Lab hares via the HPC cluster. This lab share is a mount of the linux directory inside the lab share that is accessible via PCs and Macs through SMB/CIFS shares. Files can be moved in/out of the linux directory from users end devices and then accessible from the HPC Cluster.
NOTE: Lab shares are automounted, so they won’t appear with ls /wistar. You must cd /wistar/<lab_share_name>, and it will now show.
These can be accessed via:
- File Explorer (Windows): \\cifs\lab-name\linux
- Finder (MacOS): smb://cifs/lab-name/linux
If you are a user needed access to another lab's lab share, please see Getting Help. PLEASE NOTE, we will require approval from the lab share owner.
Tempdrop
PLEASE NOTE This share is not accessible through the WI-HPC Cluster, only through Windows or MacOS. This tempdrop share is intended solely as a temporary storage solution for data. It should not be utilized for long-term storage purposes. Any data meant for retention and continued work should be promptly moved to the normal lab share.
All users have access to all lab folders within tempdrop. This is meant for collaboration between labs (e.g. Lab1 does some work for Lab2. Lab1 then places the data in Lab2's tempdrop. Lab2 transfers it to their lab share linux directory to continue work in the WI-HPC cluster.)
Custom Shares
If you have specific storage requirements based on data-set restrictions, IT can configure a custom share for use in the HPC cluster. See Getting Help for more details.
Protected Shares
Additional shares such as for dbgap or nbdc are "protected". This means that Wistar must comply with certain requirements when downloading this data. Most notably, MFA is required. Also, these shares are NOT BACKED UP as they can always just be re-downloaded.
Note
Do NOT use these protected shares as an output directory. Additional, do NOT install any software into these shares. These protected data shares are meant to hold the data and nothing else!!!
Resources
This location is specifically designed for shared data repositories that are used as part of analysis. This should be where any downloadable shared data is placed for utilization by all HPC cluster users. Examples of this type of data include: AlphaFold Databases, Collabfold Databases, etc.
If you need data placed here, please see Getting Help and we will work with you to get this data downloaded and stored.
NOTE - this is a READ-ONLY location and is not BACKED UP - it is designed for speed and effective data management practices - there is no need to put common database in your lab shares that are being backed up.
Applications
This location is designed for centrally installed applications that can be loaded via the Modules command. All applications here are installed centrally by IT.
Notes on Linux Permissions
Linux permissions define who can do what with a file or folder. Every file or folder has three levels of access: Owner, Group, and World (or "Others"). Here's what each level means:
- Owner: This is a single person (or user) who owns the file or folder. Think of them as the "boss" of the file—they have their own specific set of permissions.
- Group: This is a single group of users. Members of this group share the same permissions for the file or folder. For example, if a file’s group is set to "scientists," then anyone in the "scientists" group gets the same permissions.
- World: This refers to everyone else on the system who is not the owner or in the group. These permissions apply to all other users.
Types of Permissions
Each of these levels (Owner, Group, World) can have a combination of:
- Read (r): The ability to view the contents of a file or folder.
- Write (w): The ability to modify the contents of a file or add/remove items in a folder.
- Execute (x): The ability to run a file (like a script) or access a folder.
For example:
- rw- means read and write access, but not execute.
- r-x means read and execute access, but not write.
- rwx means read, write, and execute, full access.
Key Limitation: One Owner/Group, One Set of Permissions
A file or folder can only have one owner and group assigned to it at a time, and that owner/group has one specific set of permissions. This means:
- There can only be one owner of a file or folder
- If the group has "read-only" access, all members of that group have read-only access.
- You cannot assign different permissions to different groups. For example, you can't have one group with "read-only" access and another group with "read/write" access. The system doesn't allow multiple groups with different permissions on the same file or folder.
Why Does This Matter?
This setup makes managing permissions simpler but also more rigid. If you need more flexibility (like having one group with read-only access and another group with read/write access), please see Getting Help with details on what you want to accomplish and we are happy to discuss different approaches that will fit your needs.
When it comes to shares in the WI-HPC cluster, we set the permissions at the top-level (parent) and configure for subsequent files/folders to inherit these permissions down the tree. We do NOT nest additional groups and/or permissions inside of shares.
In summary, every file has one owner, one group, and "everyone else"—and each of these categories can only have one specific set of permissions.
See the following website and video links to help you better understand how Linux permissions are structured:
Archiving Data
Archiving data ensure that important information is securely stored and easily retrievable when needed as well as saving space in your lab share.
See our Archiving for more information.
PLEASE NOTE: Larger directories will take a few days to archive, please refrain from attempting to access the directory as to not interrupt the archiving process.
Transferring Data
Large File Transfers
You can use the Globus service to perform larger data transfers between your local machine and the clusters. Globus provides a robust and resumable way to transfer larger files or datasets. Please see their official docs to get started.
As a best practice, using the scp and rsync commands should only be used for small files/folders. Even then, the best way to access your lab shares's file system would be to mount your lab share on a local device and navigating to the linux directory. Please see Connect to Network Share Devices
Graphical Transfer Tools
Cyberduck
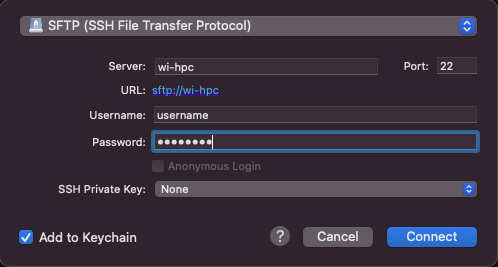
You can also transfer files between your local computer and a cluster using an SFTP client, such as Cyberduck (OSX/Windows). You will need to configure the client with your netid as the username, the cluster transfer node as the hostname and your private key as the authentication method. An example configuration of Cyberduck is shown below.
Command-Line Transfer Tools
NOTE: The scp and rsync commands should only be used for small to medium data. Any large data should be transferred by mounting your lab share on your local device and dropping it into your lab shares linux directory. Or by using Globus, see Large File Transfers
scp and rsync
Linux and macOS users can use scp or rsync. Use the hostname of the cluster transfer node (see above) to transfer files. These transfers must be initiated from your local machine.
scp and sftp are both used from a Terminal window. The basic syntax of scp is
scp [from] [to]
The from and to can each be a filename or a directory/folder on the computer you are typing the command on or a remote host (e.g. the transfer node).
Transfer a File from Your Computer to a Cluster
Using the example netid abc123, following is run on your computer's local terminal.
scp myfile.txt abc123@wi-hpc.wistar.upenn.edu:/home/username/abc123/test
In this example, myfile.txt is copied to the directory /home/username/abc123/test: on Grace. This example assumes that myfile.txt is in your current directory. You may also specify the full path of myfile.txt.
scp /home/xyz/myfile.txt abc123@twi-hpc.wistar.upenn.edu:/home/username/abc123/test
Transfer a Directory to a Cluster
scp -r mydirectory abc123@wi-hpc.wistar.upenn.edu:/home/username/abc123/test
In this example, the contents of mydirectory are transferred. The -r indicates that the copy is recursive.
Transfer Files from the Cluster to Your Computer
Assuming you would like the files copied to your current directory:
scp abc123@wi-hpc.wistar.upenn.edu:/home/username/abc123/myfile.txt .
Note that . represents your current working directory. To specify the destination, simply replace the . with the full path:
scp abc123@wi-hpc.wistar.upenn.edu:/home/username/abc123/myfile.txt /path/myfolder