Scheduling Jobs
This section is intended to be a basic introduction to using the workload manager for the Wistar managed cluster for high performance computing. Slurm is the workload manager that manages both your jobs and the resources available in the WI-HPC cluster.
Examples of use
Interactive Jobs
A interative job allows for interacting with applications in real time.
[username@wi-hpc-hn1 ~]$ srun --pty /bin/bash
[username@node0xx ~]$ echo "Hello Wistar!"
Hello Wistar!
Batch Jobs
Batch jobs allow for the scripting of job submissions using a SBATCH file.
!#/bin/bash
#SBATCH --job-name=test
echo "Hello Wistar!"
Please see the wi-hpc GitHub Repository that is an evolving resource for the community containing working examples of using Slurm at Wistar. This is an evolving example repo that new users can refer to to begin to get into parallel computing and more adept use of Slurm. Or you can download our template scripts:
or on the wi-hpc cluster run:
wget https://hpc.apps.wistar.org/scripts/standard-template.sh
wget https://hpc.apps.wistar.org/scripts/gpu-template.sh
If you are a WI-HPC user and would like to contribute to the documentation or the examples there, to share with the community how you structure your interactions with Slurm, submit a pull request there.
Basic Slurm Terminology
Cluster
A cluster is a collection of compute resources (nodes) under the control of the workload manager (Slurm in our case).
Partition
A partition is a collection of resources (nodes) inside of a cluster. There are defaults, so specifying a partition name is not required but can be specified under special circumstances (e.g. if your jobs can be preempted).
| Partition/Queue | QOS | Description |
|---|---|---|
| defq | general_qos | The default partition/queue |
| gpu | general_qos | The GPU partition/queue --partition=gpu |
| smq | smq_qos | The "small" queue. --partition=smq Short resource intensive jobs. 4 Hours Max |
Quality of Service
A “Quality of Service” is another mechanism for jobs to request certain features, scheduling priority, and limits. The attributes of the QOS are combined with the other job features (partition, account, etc.) to achieve specific behavior on the cluster. Notably, this is used for submitting restart jobs.
| QOS | Tied To | Max CPUs | Max Memory (RAM) | Max GPUs | Max WallTime |
|---|---|---|---|---|---|
| general_qos | defq | 400 | 2400 GB | 20 | Unlimited |
| smq_qos | smq | 800 | 4800 GB | 32 | 4 Hours |
| ext_qos | per user by request | 400 | 2400 GB | 20 | Unlimited |
Wall Time
A wall time is the amount of time allow from job start to end. Wall times will end jobs if they are not finished. If no time is specified, your job will default to 1 hour.
It is best practice to ALWAYS submit jobs with a time #SBATCH --time=D-HH:MM:SS. This will allow your job to be scheduled and completed faster.
Priority
Priority (the “priority score”) is used to order pending jobs in the queue with jobs having a higher score run before those with a lower score. The priority calculation is based primarily on the historical usage of cluster resources by an account- accounts with high utilization (i.e. lots of jobs and lots of CPUs) have lower priority scores than those accounts with lower usage.
Time queued does factor in to the priority score but is a relatively minor component of the priority score
Submitting jobs
Resource Limits
Limits on resources is enforced by a QOS (Quality of Service). A list of the Partitions and their QOS's are below:
| Partition/Queue | QOS | CPUs | GPUs | Memory (GB) | Wall Time |
|---|---|---|---|---|---|
| defq | general | 400 | 20 | 2400 | UNLIMITED |
| smq | smq_qos | 800 | 32 | 4800 | 04:00:00 |
| ext_qos | n/a | 400 | 20 | 2400 | UNLIMITED |
The ext_qos is reserved for users running job(s) for other labs. If you also do work for other labs, please see Getting Help to be added.
Key Slurm Commands
Man pages exist for all Slurm daemons, commands, and API functions. The command option --help also provides a brief summary of options. Note that the command options are all case sensitive
| Command | Description |
|---|---|
| sacct | used to report job or job step account information about active or completed jobs. |
| salloc | used to allocate resources for a job in real time. Typically this is used to allocate resources and spawn a shell. The shell is then used to execute srun commands to launch parallel tasks. |
| sattach | used to attach standard input, output, and error plus signal capabilities to a currently running job or job step. One can attach to and detach from jobs multiple times. |
| sbatch | used to submit a job script for later execution. The script will typically contain one or more srun commands to launch parallel tasks. |
| sbcast | used to transfer a file from local disk to local disk on the nodes allocated to a job. This can be used to effectively use diskless compute nodes or provide improved performance relative to a shared file system. |
| scancel | used to cancel a pending or running job or job step. It can also be used to send an arbitrary signal to all processes associated with a running job or job step. |
| sinfo | reports the state of partitions and nodes managed by Slurm. It has a wide variety of filtering, sorting, and formatting options. |
| sprio | used to display a detailed view of the components affecting a job's priority. |
| squeue | reports the state of jobs or job steps. It has a wide variety of filtering, sorting, and formatting options. By default, it reports the running jobs in priority order and then the pending jobs in priority order. |
| srun | is used to submit a job for execution or initiate job steps in real time. srun has a wide variety of options to specify resource requirements, including: minimum and maximum node count, processor count, specific nodes to use or not use, and specific node characteristics (so much memory, disk space, certain required features, etc.). A job can contain multiple job steps executing sequentially or in parallel on independent or shared resources within the job's node allocation. |
| sshare | displays detailed information about fairshare usage on the cluster. Note that this is only viable when using the priority/multifactor plugin. |
| sstat | used to get information about the resources utilized by a running job or job step. |
| strigger | used to set, get or view event triggers. Event triggers include things such as nodes going down or jobs approaching their time limit. |
Key Slurm Flags
Please refer to this Slurm Cheat Sheet for more options.
Please use the LONG flags as listed below, rather than the short flags. This makes it easy for you and others to understand.
| Flag | Description | Default |
|---|---|---|
| --account=name | Account to be charge for the resources used | lab name |
| --job-name=name | Job name | Not Set |
| --partition=names | Partition/queue in which to run the job | defq |
| --time=time (e.g. "--time=01:00:00") | Wall clock time limit | Not Set |
| --begin=DD-HH:MM:SS | Initiate job after specified time | now |
| --end=DD-HH:MM:SS | Terminate job after specified time | Not Set |
| --nodes=# | Number of nodes to be used (ONLY IF USING MPI) | 1 |
| --ntasks=count | Number of tasks to be launched - total allocated CPUs will be defined in combination the cpus-per-task flag | 1 |
| --cpus-per-task=count | Number of CPUs required per task | 1 |
| --gres=name[:count] | generic resources required per node (i.e. GPUs) | 0 |
| --mem=MB | Memory required per node, MB by default, must put "G" after number to enforce GB | 1000 |
| --mem-per-cpu=MB | Memory required per allocated CPU, MB by default, must put "G" after number to enforce GB | Not Set |
| --output=name | File in which to store job output | Not Set |
| --error=name | File in which to store job errors | Not Set |
| --mail-type=OPTION | Notify user by email when certain event types occur. Valid type values are NONE, BEGIN, END, FAIL, REQUEUE, ALL | None |
| --mail-user=username@wistar.org | User to receive email notification of state changes as defined by --mail-type | submitting user |
The --ntasks flag is the number of tasks in a job or job step.
When used in a SBATCH script, it specifies the maximum amount of tasks that can be executed in parallel (at the same time). It also dictates how many resources are assigned to the job.
When --ntasks is greater than 1 a job may be assigned multiple nodes, but the size of any 1 task cannot exceed a single node's resources (e.g. 48 CPUs and 280GB of memory).
Examples
sbatch is used to submit a job script to the cluster. These jobs run without your intervention or input.
Minimal Configuration: The following example script is the minimal configuration necessary to get a job running. It assumes the placing the job in the default partition, allocates of 1 CPU, 1GB RAM and a combined error/output file (Cluster defaults) Note that the output file will be place in the users home directory.
#!/bin/bash
#
#SBATCH --job-name Basic  # Defines the Job Name
module load Anaconda3
python matrix_inverse.py
Standard Configuration: The following example script specifies a partition, time limit, memory allocation and number of cores. All your scripts should specify values for these four parameters. You can also set additional parameters as shown, such as job name and output file. For This script performs a simple task — it generates of file of random numbers and then sorts it. A detailed explanation the script is available here.
#!/bin/bash
#SBATCH --job-name=sample               # create a short name for your job
#SBATCH --partition=defq                # shared partition (queue)
#SBATCH --time=00:01:00                 # total run time limit (HH:MM:SS)
#SBATCH --mail-type=begin,end,fail      # send email when job begins,ends,fails
#SBATCH --mail-user=username@wistar.org # email to send alerts to
#SBATCH --output slurm.%N.%j.out        # Output file name and Location
#SBATCH --error slurm.%N.%j.err         # Error file name and Location
for i in {1..100000}; do
echo $RANDOM  SomeRandomNumbers.txt
donesort SomeRandomNumbers.txt
If you want to test your job and find out when your job is estimated to run use (note this does not actually submit the job):
sbatch --test-only myscript.slurm
Now you can submit your job with the command:
sbatch myscript.slurm
srun
srun is used to run a task on the cluster. This is an interactive session, where you can directly view output as its produced or provide input.
This section details a few examples using srun. You should first review the hardware and partitions of the cluster sections to to can tailor your request to fit both the needs of your job and the limits of the partitions. Also keep in mind that while these examples are all valid, general examples, they might not work for your particular job.
A simple srun example is to move to a compute node after you first log into Discovery.
srun --pty /bin/bash
To request one node, with 10 tasks and 3 CPUs per task (a total of 30 CPUs), 1GB of memory TOTAL:
srun --nodes 1 --ntasks 10 --cpus-per-task 3 --pty --export=ALL --mem=1G /bin/bash
To request one node, with 5 tasks and 2 CPUs per task (a total of 10 CPUs), 2GB of memory per CPU (20GB total):
srun --nodes 1 --ntasks 5 --cpus-per-task 2 --pty --export=ALL --mem-per-cpu=2G /bin/bash
To allocate a GPU node, you should specify the gpu partition and use the –gres option:
srun --partition=gpu --nodes=1 --ntasks=1 --export=ALL --gres=gpu:1 --mem=2Gb /bin/bash
Job Arrays
Warning
We have started to notice an issue where if running thousands of short time array jobs (e.g. 10,000 jobs >60 seconds) the memory utilization on wi-hpc-hn1 skyrockets. As a rule of thumb, only run large array jobs when a single step takes more than ~10-20 minutes. Also, keep the job step on the low side. We are working on finding the root cause of this issue and a fix. If it is found you are running one of these kinds of jobs, your jobs may be cancelled to ensure that the head/login node does not crash. Thank you for your understanding and patience.
Job arrays allow many jobs to be submitting simultaneously with the same requirements. Within each job the environment variable $SLURM_ARRAY_TASK_ID is set and can be used to alter the execution of each job in the array. Note that as is true for regular jobs, each job in the array will be allocated one or more entire nodes, so job arrays are not a way to bundle multiple tasks to run on a single node.
By default, output from the job arrays is placed in a series of log files named slurm-%A_%a.out, where %A is the overall job ID and the %a is the task ID.
For example, the following script would write "I am task 0" to array_job_XXXXXX_task_0.out, "I am task 1" to array_job_XXXXXX_task_1.out, etc, where XXXXXX is the job ID.
#!/bin/bash
#SBATCH --job-name=test
#SBATCH --account=wistar
#SBATCH --partition=defq
#SBATCH --nodes=1
#SBATCH --ntasks-per-node=1
#SBATCH --cpus-per-task=20
#SBATCH --time=00:00:30
#SBATCH --array=0-31
#SBATCH --output=array_job_%A_task_%a.out
#SBATCH --error=array_job_%A_task_%a.err
## Command(s) to run:
echo "I am task $SLURM_ARRAY_TASK_ID"
Please see our Slurm Examples Repository for array jobs in GitHub.
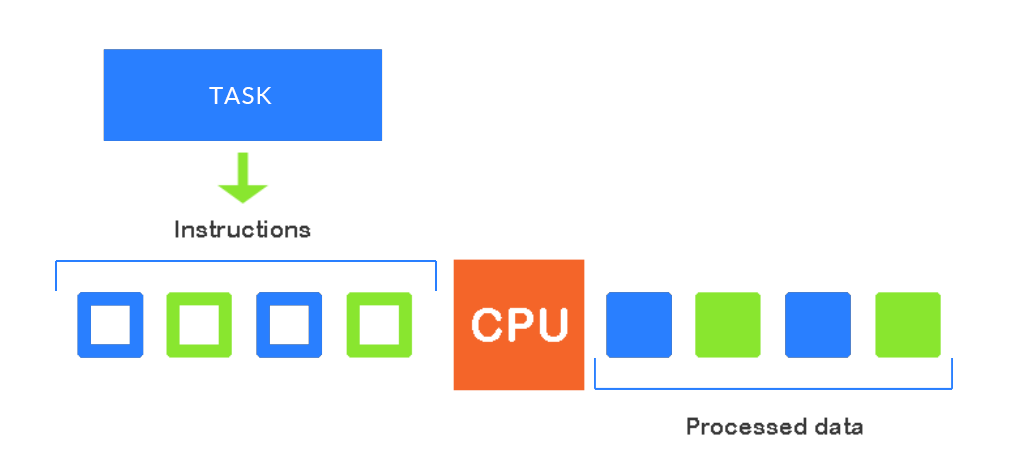
Serial vs Parallel Jobs
Running jobs in a series mean that every task will be executed one after the other (serially). You can take advantage of the cluster even better when running your jobs in parallel than in a series. This way, you can execute many more tasks once (simultaneously) and achieve a faster result.
Serial Programs
Serial programs are designed for trivial applications and simple calculations that do not require much processing power or speed.
Parallel Programs
Running in parallel in the WI-HPC cluster can be achieved in multiple ways. This is ideal when wanting to run several independent jobs.
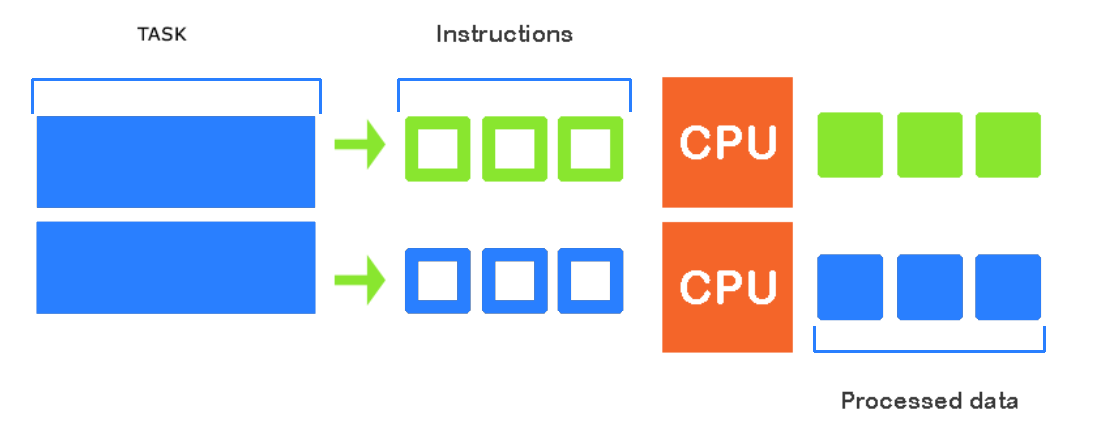
Please note that in order to run multiple independent jobs, you must request more than one task, i.e --ntasks=3.
Method 1
The first example, sub1.sh requests 3 tasks and runs 3 independent srun commands. In the srun commands we assign 1 task to each command for a total of 3 tasks.
Please note the & at the each of end line. This AND operator allows all 3 commands to start at the same time.
Using the && operator will wait until the first command to execute. If and only if it is successful, the second command will then start.
#!/bin/bash
# Parallel Job Example

# standard job submission options
#SBATCH --job-name=parallel             # create a short name for your job
#SBATCH --mail-type=begin,end,fail      # send email when job begins,ends,fails
#SBATCH --mail-user=username@wistar.org # email to send alerts to
#SBATCH --output slurm.%N.%j.out        # Output file name and Location
#SBATCH --error slurm.%N.%j.err         # Error file name and Location

# parallelization dependent options
#SBATCH --time=01:00:00                 # total run time limit (HH:MM:SS)
#SBATCH --partition=defq                # shared partition (queue)
#SBATCH --ntasks=3                      # total number of tasks across all nodes
#SBATCH --cpus-per-task=1               # cpu-cores per task (>1 if multi-threaded tasks)
#SBATCH --mem-per-cpu=1GB               # total memory allocated for all tasks

module load Python/3.10.4-GCCcore-11.3.0

srun --ntasks=$SLURM_NTASKS python fibonacci.py 10 >> 10.out &
srun --ntasks=$SLURM_NTASKS python fibonacci.py 20 >> 20.out &
srun --ntasks=$SLURM_NTASKS python fibonacci.py 30 >> 30.out &
wait
Method 2 (Preferred)
The second example, sub2.sh uses and array to submit the job multiple times (without having to add additional srun commands).
This is the preferred method as simple adding new lines to the input.txt file and increasing the array size and step will work. Whereas, in Method 1 you would need to add many more srun commands and manually specify each input and output value.
This methods also uses the sed and awk commands.
sed: uses the current sub job ID to iterate through the lines ofinput.txtand return the row's value.awk: returns the specified column value ($1is the first column and$2is the second column).
#!/bin/bash
# Parallel Job Example

# standard job submission options
#SBATCH --job-name=parallel             # create a short name for your job
#SBATCH --mail-type=begin,end,fail      # send email when job begins,ends,fails
#SBATCH --mail-user=username@wistar.org # email to send alerts to
#SBATCH --output slurm.%N.%j.out        # Output file name and Location
#SBATCH --error slurm.%N.%j.err         # Error file name and Location

# parallelization dependent options
#SBATCH --time=01:00:00                 # total run time limit (HH:MM:SS)
#SBATCH --partition=defq                # shared partition (queue)
#SBATCH --ntasks=3                      # total number of tasks across all nodes
#SBATCH --cpus-per-task=1               # cpu-cores per task (>1 if multi-threaded tasks)
#SBATCH --mem-per-cpu=1GB               # total memory allocated for all tasks
#SBATCH --array=1-12%3                  # job array from 1 - 12 with step 3 (3 sub jobs at a time)

module load Python/3.10.4-GCCcore-11.3.0

input=`sed -n "$SLURM_ARRAY_TASK_ID"p input.txt |  awk '{print $1}'`
output=`sed -n "$SLURM_ARRAY_TASK_ID"p input.txt |  awk '{print $2}'`

python fibonacci.py $input >> $output
If our input.txt file looks like:
10 10.out
20 20.out
30 30.out
40 40.out
50 50.out
60 60.out
70 70.out
80 80.out
90 90.out
100 100.out
110 110.out
120 120.out
The first iteration (i.e. $SLURM_ARRAY_TASK_ID = 1), the input and output variables are evaluated to:
input=10
output=10.out
And the fifth iteration (i.e. $SLURM_ARRAY_TASK_ID = 5), the input and output variables are evaluated to:
input=50
output=50.out
And so fourth.
This array runs a total of 12 sub jobs, 3 at a time. (#SBATCH --array=1-12%3)
Please note, as soon as 1 sub jobs completes, the next one starts. In other words, if 1, 2, and 3 all start at the same time, then 1 completes, 4 will then start (even if 2 and 3 are still running).
Method 3 (MPI)
If the jobs is very large and requires more resources that are available on a single node, jobs must be split across multiple nodes. Distributing jobs across nodes REQUIRES some sort of MPI implementation.
PLEASE NOTE: The program you are using MUST support MPI.
For more information on running parallel jobs please see our parallel job examples on GitHub.